There are multiple paths to take to get to each building and several of the buildings have multiple entrances, this will take you through the path of least resistance.
Glenda Close[]
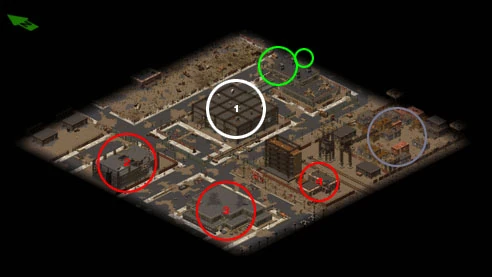
You begin right next to the building she is held in (marked 1 on the map). Though you don't want to access it directly, as the ground floor has several Hover robots (which shoot rockets) and a Tank track robot. You can avoid them altogether by heading to the building across the street to the north. On the side of this building is a ladder to the roof. On the roof there will be a Scurry robot and one Humanoid robot behind a pile of sandbags. Once these are killed use the catwalk between the two buildings to get across. Glenda Close will be in the room with the executives table which you can get to directly. Do not go into the long hallway as it is an ambush with two humanoid robots waiting on both ends of the hall. Once she is on your squad, backtrack you way to the extraction point.
Albert Lamore[]
Now, back from the extraction point go down the road until you get to a blockade, then go north through the opening in the fence to the dirt area. There will be a couple of humanoid robots here to deal with. After this you will be able to get back onto the road on the other side of the blockade. Follow it down to the large storage building (marked 2 on your map). Once you get to the front of the building it looks like there is only one entrance, but there is actually a hidden second entrance right next to it. What looks like a pile of crates and trash is actually a staircase through a hole in the wall. You can use either way to get into the building but the hidden path is suggested. If you do choose to go through the front entrance, there will be two Gun turrets waiting, though they both can be outraged. Shoot the first one from the sandbags in front of the entrance and the second by laying prone in the doorway. Now you can go upstairs, both entrances lead to the same room. Here you will find Albert Lamore, a few active landmines on the floor, and two staircases to the roof. The one on the right side will take you right next to a turret that will shoot you immediately and the one on the left will take you to a switch. This switch will deactivate all the turrets in the building, which will let you get to the chest (containing three pulse grenades) next to the turret on the roof. Be careful as there is also a scurry robot that will pop up next to it and is unaffected by the power switch. Once you are finished, ask Albert Lamore to join your squad and again escort him back to the extraction point.
Tobias Peste[]
Now you must retrace your steps back to the storage building Albert Lamore was in. From here you head south down the street, which will have a humanoid robot armed with a vindicator minigun and a few scurry robots. There are quite a few crates in the area so it is easy to miss one that can actually be checked, which has 100 .50 cal bullets and 30 canisters of acid. Now continue down the road and through a fence. Here will be a couple more humanoid robots, one with another vindicator minigun. Next to it is a pot with 3 acid grenades and some stimpaks. Now you are just outside the research building (marked 3 on the map), go on in the front door. There will be no hostiles here, just Reavers, so head directly to the ladder leading downstairs. This is where you'll find Tobias Peste, and he will give you the key to the safe next to him, which contains the EMP prototype. You can equip and use the prototype if your energy weapons skill is high enough to make use of it. Now you can take Tobias Peste back to the extraction point.
Rodger Gaire[]
Again you must backtrack all the way to the research facility you came from. From here you can head down the street (which may or may not have a patrol nearby), and into the opening in the fence to the old Nuka-Cola plant (marked 4 on the map). It will seem empty at first but as you approach the building Rodger Gaire is in you will be ambushed by five scurry bots. From the roof of the nearby building, the General's bodyguards will provide support fire if you stay within their line of sight. Once they are dealt with head into the building. On the second floor is a chest with a flamer and supplies and a dead body on the balcony. Rodger Gaire is waiting on the first floor and once ready, take him with you to the Raver base, which you can get to directly from the area you are in. Here there will be a few containers to check with mostly useless stuff, but the real prize is hidden in a maze of storage containers converted into houses. There will be a large clump of these "houses" with some stacked on top of each other, with several ladders leading up and down throughout them. Inside this short maze of ladders is a hidden room with nothing but a refrigerator. Inside this fridge is a suit of advanced power armor. Once you have it you can head back to the extraction point with the General.
Optional Objectives[]
As soon as you enter the mission, on the road in-between the two buildings is a damaged Tank. If you have a tool kit or super tool kit you can repair it and take it with you.
When you find Tobias Peste he will give you a key to open the safe next to him, which contains the prototype EMP.
Notes[]
Once you find a Reaver leader, they are added to your squad. You can only have one Reaver leader in your squad at a time.
Throughout the map Scurry robots will pop up out of the ground, so be ready for a surprise in any areas you haven't cleared.
The Reaver leaders will be permanently set to passive. In order for them to fight, they must be manually told to do so.
Bugs[]
Incorrect Glenda Close portrait. The portrait doesn't match the in-game character description. Another portrait, marked with the character's name, can be found in game resources.
All the Reaver leaders will have the "level up" alert once you find them, however only Tobias Peste has any skill points to use. Albert Lamore actually has -1 skill points. Glenda Close will allow you to pick and endless amount of perks but none of them are given to her.
All the Reaver leaders are wearing Reaver Banding or Greater Banding, which have no name and no description. If you un-equip it from them, they can not re-equip it.
In the Reaver camp there is a chest that can not be interacted with.
Seedee and Hardrive were supposed to be available from the personnel yeoman after this mission. For some unknown reason they are not being added to recruits pool.